This portal's subpages have been checked by an editor, and are needed.
Please take care when editing, especially if using automated editing software.Learn how to update the maintenance information here.
Welcome to the Military history of Australia portal!
The military history of Australia spans the nation's 230-year modern history, from the early Australian frontier wars between Aboriginal people and Europeans to the ongoing conflicts in Iraq and Afghanistan in the early 21st century. Although this history is short when compared to that of many other nations, Australia has been involved in numerous conflicts and wars, and war and military service have been significant influences on Australian society and national identity, including the Anzac spirit. The relationship between war and Australian society has also been shaped by the enduring themes of Australian strategic culture and the unique security challenges it faces.
The six British colonies in Australia participated in some of Britain's wars of the 19th century. In the early 20th century, as a federated dominion and later as an independent nation, Australia fought in the First World War and Second World War, as well as in the wars in Korea, Malaya, Borneo and Vietnam during the Cold War. In the Post-Vietnam era Australian forces have been involved in numerous international peacekeeping missions, through the United Nations and other agencies, including in the Sinai, Persian Gulf, Rwanda, Somalia, East Timor and the Solomon Islands, as well as many overseas humanitarian relief operations, while more recently they have also fought as part of multi-lateral forces in Iraq and Afghanistan. In total, nearly 103,000 Australians died during these conflicts. (Full article...)
Featured articles -
Featured articles are displayed here, which represent some of the best content on English Wikipedia.
Andrew William "Nicky" Barr, OBE,MC,DFC & Bar (10December 1915– 12June 2006) was a member of the Australian national rugby union team, who became a fighter ace in the Royal Australian Air Force (RAAF) during World WarII. He was credited with 12 aerial victories, all scored flying the Curtiss P-40 fighter. Born in New Zealand, Barr was raised in Victoria and first represented the state in rugby in 1936. Selected to play for Australia in the United Kingdom in 1939, he had just arrived in England when the tour was cancelled following the outbreak of war. He joined the RAAF in 1940 and was posted to North Africa with No.3 Squadron in September 1941. The squadron's highest-scoring ace, he attained his first three victories in the P-40 Tomahawk and the remainder in the P-40 Kittyhawk.
Barr's achievements as a combat pilot earned him the Distinguished Flying Cross and Bar. Shortly after taking command of No.3 Squadron in May 1942, he was shot down and captured by Axis forces, and incarcerated in Italy. He escaped and assisted other Allied fugitives to safety, receiving for his efforts the Military Cross, a rare honour for an RAAF pilot. Repatriated to England, he saw action during the invasion of Normandy in June 1944 before returning to Australia as chief instructor with No.2 Operational Training Unit. After the war he became a company director, and rejoined the RAAF as an active reserve officer from 1951 to 1953. From the early 1960s he was heavily involved in the oilseed industry, for which he was appointed an Officer of the Order of the British Empire in 1983. He died in 2006, aged 90. (Full article...)
Image 3
No.1 Wing was an Australian Flying Corps (AFC) and Royal Australian Air Force (RAAF) wing active during World War I and World War II. The wing was established on 1September 1917 as the 1st Training Wing and commanded the AFC's pilot training squadrons in England until April 1919, when it was disbanded. It was reformed on 7October 1942 as a fighter unit comprising two Australian and one British flying squadrons equipped with Supermarine Spitfire aircraft, and a mobile fighter sector headquarters. The wing provided air defence to Darwin and several other key Allied bases in northern Australia until the end of the war, and was again disbanded in October 1945.
During its first months at Darwin, No.1 Wing intercepted several of the air raids conducted against Northern Australia by the Imperial Japanese Army Air Force and Imperial Japanese Navy. Although the wing was hampered by mechanical problems with its Spitfires and suffered heavy losses in some engagements, it eventually downed more Japanese aircraft than it lost in combat. After the final Japanese air raid on northern Australia in November 1943, No. 1 Wing saw little combat, which led to its personnel suffering from low morale. The wing's two Australian flying squadrons were replaced with British units in July 1944, and subsequent proposals to move these squadrons to more active areas were not successful. (Full article...)
Image 4
An Australian light machine gun team in action during the Aitape–Wewak campaign, June 1945. Australia entered World WarII on 3 September 1939, following the government's acceptance of the United Kingdom's declaration of war on Nazi Germany. Australia later entered into a state of war with other members of the Axis powers, including the Kingdom of Italy on 11June 1940, and the Empire of Japan on 9December 1941. By the end of the war almost one million Australians had served in the armed forces, whose military units fought primarily in the European theatre, North African campaign, and the South West Pacific theatre. In addition, Australia came under direct attack for the first time in its post-colonial history. Its casualties from enemy action during the war were 27,073killed and 23,477wounded. Many more suffered from tropical disease, hunger, and harsh conditions in captivity; of the 21,467Australian prisoners taken by the Japanese, only 14,000 survived.
Australian Army units were gradually withdrawn from the Mediterranean and Europe following the outbreak of war with Japan. However, Royal Australian Air Force and Royal Australian Navy units and personnel continued to take part in the war against Germany and Italy. From 1942 until early 1944, Australian forces played a key role in the Pacific War, making up the majority of Allied strength throughout much of the fighting in the South West Pacific theatre. While the military was largely relegated to subsidiary fronts from mid-1944, it continued offensive operations against the Japanese until the war ended. (Full article...)
Image 5
Australian soldiers from the 2/16th Infantry Battalion arriving at Kaiapit after the area was captured by the 2/6th Independent Company
Australian soldiers from the 2/16th Battalion arriving at Kaiapit on 20 September after the area was captured by the 2/6th Independent Company
The Australian 2/6th Independent Company flew in to the Markham Valley from Port Moresby in 13 United States Army Air Forces (USAAF) C-47 Dakotas, making a difficult landing on a rough airstrip. Unaware that a much larger Japanese force was also headed for Kaiapit, the company attacked the village on 19 September to secure the area so that it could be developed into an airfield. The company then held it against a strong counter-attack. During two days of fighting the Australians defeated a larger Japanese force while suffering relatively few losses. (Full article...)
Image 6
Hughes in 1940
Paterson Clarence Hughes, DFC (19 September 1917– 7September 1940) was an Australian fighter ace of World WarII. Serving with the Royal Air Force (RAF), he was credited with as many as seventeen aerial victories during the Battle of Britain, before being killed in action in September 1940. His tally made him the highest-scoring Australian of the battle, and among the three highest-scoring Australians of the war.
Born in Cooma, New South Wales, Hughes joined the Royal Australian Air Force as a cadet in 1936. After graduating as a pilot, he chose to take a commission with the RAF. In July 1937, he was assigned to No.64 Squadron, which operated Hawker Demon and, later, Bristol Blenheim fighters. Posted to No.234 Squadron following the outbreak of World WarII, Hughes began flying Supermarine Spitfires as a flight commander. He shared in his unit's first aerial victory on 8July 1940, and began scoring heavily against the Luftwaffe the following month. Known for his practice of attacking his targets at extremely close range, Hughes is generally thought to have died after his Spitfire was struck by flying debris from a German bomber that he had just shot down. He was posthumously awarded the Distinguished Flying Cross, and was buried in England. (Full article...)
Image 7
Aircraft on display at No. 1 Aircraft Depot, September 1955
No. 1 Aircraft Depot (No.1AD) was a maintenance unit of the Royal Australian Air Force (RAAF). Formed in July 1921 at RAAF Point Cook, Victoria, it relocated to the nearby RAAF Laverton in March 1926. As well as servicing aircraft and other equipment, in its early years, the depot supported survey flights in Australia and the Pacific region. It was also responsible for training maintenance staff.
No.1 AD's strength increased from 350 staff in the 1930s to over 2,000 during World WarII, when it assembled, tested and repaired aircraft ranging from Tiger Moth trainers to Spitfire fighters to B-17 Flying Fortress heavy bombers. It also undertook aircraft research and development. (Full article...)
Melbourne was laid down for the Royal Navy as the lead ship of the Majestic class in April 1943, and was launched as HMS Majestic (R77) in February 1945. At the end of the Second World War, work on the ship was suspended until she was purchased by the RAN in 1947. At the time of purchase, it was decided to incorporate new aircraft carrier technologies into the design, making Melbourne the third ship to be constructed with an angled flight deck. Delays in construction and integrating the enhancements meant that the carrier was not commissioned until 1955. (Full article...)
HMS Nairana (/naɪˈrɑːnə/) was a passenger ferry that was requisitioned by the Royal Navy (RN) as a seaplane carrier in 1917. She was laid down in Scotland in 1914 as TSS Nairana for the Australian shipping line Huddart Parker, but construction was suspended after the outbreak of the First World War. Following resumption of work, the ship was launched in 1915, and converted to operate wheeled aircraft from her forward flying-off deck, as well as floatplanes that were lowered into the water. She saw service during the war with the Grand Fleet, and in 1918–19 supported the British intervention in the Russian Civil War.
Nairana was returned to her former owners in 1921 and refitted in her original planned configuration, and spent the next 27 years ferrying passengers and cargo between Tasmania and Melbourne. She was twice struck by rogue waves in Bass Strait, and nearly capsized on both occasions. Nairana was the only Bass Strait ferry not requisitioned for military service in the Second World War, and so became the sole passenger ship with service to Tasmania during the conflict. She was laid up in 1948, wrecked in a storm three years later and scrappedin situ in 1953–54. (Full article...)
The F-4C variant of the PhantomII was among the aircraft evaluated by the RAAF in 1963 as part of the project to replace its English Electric Canberra bombers. The F-111 was selected, but when that project was delayed in the late 1960s due to long-running technical faults with the aircraft, the RAAF determined that the F-4E PhantomII would be the best alternative. As a result of continued problems with the F-111s, the Australian and United States Governments negotiated an agreement in 1970 whereby the RAAF leased 24 F-4Es and their support equipment from the USAF. (Full article...)
Selected articles -
Image 1
c.1780 portrait of a British marine lieutenant
The New South Wales Marine Corps was a battalion-sized unit of the British Marine Forces created to guard convicts aboard the First Fleet to Australia, and to preserve "subordination and regularity" in the colony of New South Wales. Established in 1786, the unit served in New South Wales from 1788 to 1792, and was instrumental in establishing the colony's rule of law. Study of the complete New South Wales Marine complement indicates they were chosen from the Plymouth and Portsmouth Divisions, with only one exception. Beginning with guards arriving with the 2nd and 3rd fleets but officially with the arrival of HMSGorgon on 22 September 1791, the New South Wales Marines were relieved by a newly formed British Army regiment of foot, the New South Wales Corps. (Full article...)
Image 2
An Australian soldier manning the MAG58 machine gun while on guard duty in Borneo during 1965 The Indonesia–Malaysia confrontation (Indonesian: Konfrontasi) was fought from 1962 to 1966 between the British Commonwealth and Indonesia. Indonesia, under President Sukarno, sought to prevent the creation of the new Federation of Malaysia that emerged in 1963, whilst the British Commonwealth sought to safeguard the security of the new state. The war remained a limited one however, and was fought primarily on the island of Borneo, although a number of Indonesian seaborne and airborne incursions into the Malay Peninsula did occur. As part of Australia's continuing military commitment to the security of Malaysia, Australian army, naval and air force units were based there with the Far East Strategic Reserve, mainly in the 28th Commonwealth Infantry Brigade Group.
The Australian Government was initially reluctant to become involved in the conflict, and Australian forces did not see combat until 1964. Australia's involvement expanded in 1965, however, following repeated requests from the British Government with an Australian infantry battalion and special forces being deployed to Borneo where they were involved in a number of actions against Indonesian Army units. Other army units deployed included artillery batteries and engineers, both of which served tours in support of the infantry in Borneo. A number of RAN warships also patrolled the waters off Borneo and Malaysia to deter Indonesian infiltration parties, and were involved in shelling Indonesian positions in Borneo and in repelling infiltrators in the Singapore Strait. The RAAF played only a relatively minor role, although it would have been used far more extensively had the war escalated. (Full article...)
Image 3
[A production AC1 tank]
An AC MkI tank on trials
The AC1 Sentinel was a cruiser tank designed in Australia in World War II in response to the war in Europe, and to the threat of Japan expanding the war to the Pacific or even a feared Japanese invasion of Australia. It was the first tank to be built with a hull cast as a single piece, and the only tank to be produced in quantity in Australia. The few Sentinels that were built never saw action as Australia's armoured divisions had been equipped by that time with British and American tanks. (Full article...)
Image 4
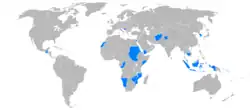
Australian peacekeeping deployments since 1945 Australian military involvement in peacekeeping operations has been diverse, and included participation in both United Nations sponsored missions, as well as those as part of ad hoc coalitions. Indeed, Australians have been involved in more conflicts as peacekeepers than as belligerents; however, according to Peter Londey "in comparative international terms, Australia has only been a moderately energetic peacekeeper." Although Australia has had peacekeepers in the field continuously for 60 years – the first occasion being in Indonesia in 1947, when Australians were among the first group of UN military observers – its commitments have generally been limited, consisting of small numbers of high-level and technical support troops (e.g. signals, engineers or medical units) or observers and police. David Horner has noted that the pattern changed with the deployment of 600 engineers to Namibia in 1989–90 as the Australian contribution to UNTAG. From the mid-1990s, Australia has been involved in a series of high-profile operations, deploying significantly large units of combat troops in support of a number of missions including those in Cambodia, Rwanda, Somalia and later in East Timor. Australia has been involved in close to 100 separate missions, involving more than 30,000 personnel and 11 Australians have died during these operations. (Full article...)
Towards the end of the nineteenth century, an escalating conflict between the British Empire and the Boer republics of southern Africa, led to the outbreak of the Second Boer War, which lasted from 11 October 1899, until 31 May 1902. In a show of support for the empire, the governments of the self-governing British colonies of Canada, New Zealand, Natal, Cape Colony and the six Australian colonies all offered men to participate in the conflict. The Australian contingents, numbering over 16,000 men, were the largest contribution from the Empire, and a further 7,000 Australian men served with other colonial or irregular units. At least 60 Australian women also served in the conflict as nurses. (Full article...)
Image 7
HMAS Kanimbla entering Pearl Harbor during RIMPAC 2010
The Kanimbla class was a class of amphibious transport ships (designated Landing Platform Amphibious) operated by the Royal Australian Navy (RAN). Two ships (originally built as Newport-class tank landing ships for the United States Navy) were purchased by Australia in 1994 and modified. Problems during the handover process and the need to repair previously unidentified defects meant the ships did not enter operational service until the end of the decade.
Many of the tactics employed, such as the use of combined arms, illustrated the evolution of military tactics, from the massed attacks mounted earlier in the war. The objectives were achieved within 93 minutes, just three minutes longer than Monash's calculated battle time. (Full article...)
...that the 2/12th Field Ambulance suffered the highest rate of casualties for a non-combatant unit in Australian history?
...that the Office of Australian War Graves is also responsible for the maintenance of some 20,000 graves of Commonwealth war dead in 76 war cemeteries and plots and in numerous civil cemeteries, as well as Memorials to the Missing listing over 3,000 names?
The fighting occurred following a failed landing by Australian forces at Porton Plantation in early June, which was part of an attempt to outflank a series of strong points that the Japanese had built across the base of the Bonis Peninsula. After this, the fighting in the northern sector around Ratsua essentially became a containment action for the Australians as they concentrated their efforts and resources upon driving south towards Buin, which was the main centre of Japanese resistance on the island at the time. As a result, the situation around Ratsua remained largely static until the end of hostilities in mid-August 1945. (Full article...)
Image 2
Members of the 2/18th Battalion on board a ferry at Sydney, New South Wales, bound for the ship assigned to transport them to Malaya
The 2/18th Battalion was an Australian Army infantry unit that served during World War II. Formed in June 1940, the battalion was assigned to the 22nd Brigade, which formed part of the Australian 8th Division. After completing basic training, the 2/18th was sent to Singapore and Malaya to strengthen the defences of the British colonies in February 1941 against a possible Japanese attack. The 2/18th Battalion subsequently undertook garrison duties throughout the year at various locations in Malaya, where it conducted jungle training and constructed defences along the eastern coast.
Following the outbreak of war in the Pacific in December 1941, the 2/18th saw action against Japanese forces in the Malayan campaign, during which they took part in a large-scale ambush of a Japanese force on the Malay Peninsula before joining the withdrawal to Singapore in early 1942. Assigned to defend part of the north-west coast of the island, the battalion participated in the unsuccessful defence of Singapore in early February 1942. Following the fall of Singapore the majority of the battalion's personnel were taken as prisoners of war. Many of these men died in captivity; the survivors were liberated in 1945 and returned to Australia where the battalion was disbanded. (Full article...)
An Australian soldier from 3RAR with an L4A4 Bren light machine-gun, on patrol near the Sarawak-Kalimantan border, 1965.
The Battle of Sungei Koemba (27 May– 12 June 1965) took place during the Indonesia–Malaysia confrontation. Involving Australian and Indonesian troops, the battle consisted of a series of ambushes launched by the 3rd Battalion, Royal Australian Regiment (3 RAR), along the Sungei Koemba river in Kalimantan (Indonesian Borneo). The ambushes were part of the wider Operation Claret which involved cross-border operations by British-Commonwealth units from bases in Sarawak, penetrating up to 10,000 yards (9,100m) into Indonesian territory with the aim of disrupting the movement and resupply of Indonesian forces and to keep them off balance.
The first ambush was conducted by two platoons from B Company on 27 May 1965 and resulted in significant Indonesian casualties, for no loss to the Australians. The second ambush was conducted a fortnight later and was set a little further downstream from the last one, this time by a platoon from C Company, occurring on 12 June 1965 and again resulting in heavy Indonesian casualties for no loss to the Australians. (Full article...)
Image 5
Beaufort crew of No.7 Squadron, which operated under the control of No.75 Wing in 1943–44
RAAF Station Bundaberg, home of No.8 Service Flying Training School, photographed from an Avro Anson in 1944
No. 8 Service Flying Training School (No.8 SFTS) was a flying training school of the Royal Australian Air Force (RAAF) that operated during World WarII. It was formed in December 1941, and graduated its first course in March 1942. Responsible for intermediate and advanced instruction of pilots under the Empire Air Training Scheme (EATS), the school was based at RAAF Station Bundaberg, Queensland, and operated Avro Anson aircraft. It spawned two maritime patrol squadrons in early 1943, raised in response to increased Japanese submarine activity off Australia's east coast. Some of the school's aircraft were also attached to the Australian Army in 1944–45. No.8 SFTS completed its final training course in December 1944, and was disbanded in July 1945. (Full article...)
Image 7
Catalinas of No. 20 Squadron (foreground) and No. 42 Squadron (background)
No. 285 Squadron was a Royal Australian Air Force (RAAF) training squadron. Controlled by No.84 Wing, the squadron was formed in August 1999 to train the RAAF's Lockheed Martin C-130J Herculesaircrew and ground support staff. No.285 Squadron did not control any flying aircraft but managed the flight simulator used for converting aircrew to the C-130Js operated by No.37 Squadron. It was also allocated decommissioned Hercules airframes for training purposes, as well as flying aircraft from No.37 Squadron when required. Throughout its existence, No. 285 Squadron was located at RAAF Base Richmond in the western suburbs of Sydney. The squadron was disbanded in December 2017. (Full article...)
Image 9
Officers from the 2nd Battalion at Giza, December 1914
The 2nd Battalion was an infantrybattalion of the Australian Army. It was initially raised for service during the First World War as part the Australian Imperial Force and saw action at Gallipoli before being sent to the Western Front in mid-1916, where it spent the next two-and-a-half years taking part in the fighting in the trenches of France and Belgium. Following the conclusion of hostilities, the battalion was disbanded in early 1919 as part of the demobilisation process.
In 1921, the battalion was re-raised as a part-time unit of the Citizens Forces based in Newcastle, New South Wales, drawing lineage from a number of previously existing infantry units. They remained in existence until 1929 when, due to austerity measures during the Great Depression and manpower shortages, the battalion was amalgamated with two other infantry battalions over the course of a number of re-organisations. It was re-formed in 1939 and undertook garrison duty in Australia during the Second World War until 1943 when it was merged once again. (Full article...)
Image 10
Murphy (left) and Wrigley during their pioneering trans-Australia flight, 1919
Image 8"He's coming south — It's fight, work or perish", a propaganda poster warning of the danger of Japanese invasion. (from Australia in World War II)
Image 33Australian soldiers and local civilians on Labuan Island. The soldier on the left is armed with an Australian-designed Owen gun. (from Australia in World War II)
Image 34MacArthur with Blamey and Prime Minister Curtin in March 1942 (from Australia in World War II)
"Australian troops had, at Milne Bay, inflicted on the Japanese their first undoubted defeat on land. Some of us may forget that, of all the allies, it was the Australians who first broke the invincibility of the Japanese army."
Auckland Regiment •Canterbury Regiment (currently a redirect) • 7th Brigade (New Zealand) • 11th Brigade (New Zealand) • 12th Brigade (New Zealand) • South Australian Imperial Bushmen • Tasmanian Citizen Bushmen • Tasmanian Mounted Infantry •Tasmanian Imperial Bushmen (currently redirect) • 1st Military Police Battalion (Australia) • Victorian Citizen Bushmen • Victorian Imperial Bushmen •Western Australian Mounted Infantry (currently redirect) • Western Australian Citizen Bushmen • 2nd/4th Battalion, Royal New Zealand Infantry Regiment • 3rd/6th Battalion, Royal New Zealand Infantry Regiment • No. 83 (Army Cooperation) Wing • No. 52 Squadron RNZAF • No. 51 Squadron RNZAF • No. 43 Squadron RNZAF • No. 12 Squadron RNZAF • No. 11 Squadron RNZAF • No. 10 Squadron RNZAF • CAC/North American Avon Sabre in Australian service • GAF/Dassault Mirage III in Australian service • Harry Charles Bundock • Grant Cavenagh • Frederick Hay Christison • John August Clareborough • Jack Kerr Coffey • John Craven • Ralph Daly • Charles Stewart Davies • Harold Charles de Low • William Huggett Douglas • Herbert Frederick Henry Durant • Leslie Glanville Howard Dyke • Henry Herrick Edwards • Cyril Maurice Lloyd Elliott • Frederick Percy Herbert Fewtrell • Alexander Moore Forbes • Stephen Gilbert Friend • Vivian Harrold Gatliff • Arthur Harry Langman Godfrey • Leonard George Goss • Peter Haddad • William Allan Hailes • Neville Gordon Hatton • Health Services Wing RAAF • William Alexander Henderson • John Hill • Frederick Brock Hinton • Oswald Vick Hoad • Austin Claude Selwyn Holland • Maurice Barber Bevan Keating • Douglas Oswald Luke Kitto • Errol Knox • Ian Lillie • Thomas Steane Louch • John Walter Main • Gordon Edward Manchester • James Eric Gifford Martin • Athelsan Markham Martyn • John Maxwell • Patrick Sanfield McGrath • Eric George Henderson McKenzie • Kenneth Alan McKenzie • Douglas Murray McWhae • Arthur James Mills • Raymond Frederic Monaghan • Gerald Vincent Moriarty •New Zealand Infantry Brigade (currently a redirect) • Edward Michael Neylan • Francis Roger North • Harry Scott Nurse • David O'Brien • Douglas Paine • William Edward Hill Pascoe • Michael Phelps • Claude Esdaile Prior • Ralph Carlyle Geoffrey Prisk • Beauchamp Worters Pulver • John Herbert Rasmussen • Henry Gordon Rourke • Harry Blamyre Sewell • Colin McOlvin Sharp • Edward Lonergan Sheehan • James Thomas Simpson • Fritz Peter Max Solling • William Howard St. Clair • Robert Mackay Stodart • Roy Buchanan Sutherland • Harold Bourue Taylor • Percy Chamberlin Thompson • Roy Meldrum Thompson • Walter James Urquhart • Donald Norwood Veron • Roy William Whiston Walsh • Augustine William Wardell • Thomas Edgar Weavers • David Welch • Frank Elwyn Wells • Allan Respen Wendt • Ernst Morgan Williams • Kenneth Williams • Kenneth Agnew Wills • Roy Gordon • New Zealand Rarotongan Company • Joint Task Force 633













 Commons
 Wikidata
 Wikiquote
 Wikisource
 Wikiversity
 Wiktionary
 List of all portals




 Random portal
 WikiProject Portals