Oakleigh railway station
Oakleigh | |||||||||||||||||||||||||||||||||||||||||||||||||||||||||||||||
|---|---|---|---|---|---|---|---|---|---|---|---|---|---|---|---|---|---|---|---|---|---|---|---|---|---|---|---|---|---|---|---|---|---|---|---|---|---|---|---|---|---|---|---|---|---|---|---|---|---|---|---|---|---|---|---|---|---|---|---|---|---|---|---|
 South-east bound view from Platform 1 (formerly Platform 2), August 2025 | |||||||||||||||||||||||||||||||||||||||||||||||||||||||||||||||
| General information | |||||||||||||||||||||||||||||||||||||||||||||||||||||||||||||||
| Location | Haughton Road, Oakleigh, Victoria 3166 City of Monash Australia | ||||||||||||||||||||||||||||||||||||||||||||||||||||||||||||||
| Coordinates | 37°54′02″S 145°05′18″E / 37.9005°S 145.0883°E | ||||||||||||||||||||||||||||||||||||||||||||||||||||||||||||||
| System | PTV commuter rail station | ||||||||||||||||||||||||||||||||||||||||||||||||||||||||||||||
| Owner | VicTrack | ||||||||||||||||||||||||||||||||||||||||||||||||||||||||||||||
| Operator | Metro Trains | ||||||||||||||||||||||||||||||||||||||||||||||||||||||||||||||
| Lines | |||||||||||||||||||||||||||||||||||||||||||||||||||||||||||||||
| Distance | 16.59 kilometres from Southern Cross | ||||||||||||||||||||||||||||||||||||||||||||||||||||||||||||||
| Platforms | 2 side (excluding one removed) | ||||||||||||||||||||||||||||||||||||||||||||||||||||||||||||||
| Tracks | 2 (excluding one removed) | ||||||||||||||||||||||||||||||||||||||||||||||||||||||||||||||
Train operators | Metro Trains | ||||||||||||||||||||||||||||||||||||||||||||||||||||||||||||||
| Connections |  Bus | ||||||||||||||||||||||||||||||||||||||||||||||||||||||||||||||
| Construction | |||||||||||||||||||||||||||||||||||||||||||||||||||||||||||||||
Structure type | At-grade | ||||||||||||||||||||||||||||||||||||||||||||||||||||||||||||||
| Parking | 400 spaces | ||||||||||||||||||||||||||||||||||||||||||||||||||||||||||||||
Cycle facilities | Yes | ||||||||||||||||||||||||||||||||||||||||||||||||||||||||||||||
| Accessible | Yes—step free access | ||||||||||||||||||||||||||||||||||||||||||||||||||||||||||||||
| Other information | |||||||||||||||||||||||||||||||||||||||||||||||||||||||||||||||
| Status | Operational, premium station | ||||||||||||||||||||||||||||||||||||||||||||||||||||||||||||||
| Station code | OAK | ||||||||||||||||||||||||||||||||||||||||||||||||||||||||||||||
| Fare zone | Myki zone 1/2 | ||||||||||||||||||||||||||||||||||||||||||||||||||||||||||||||
| Website | Public Transport Victoria | ||||||||||||||||||||||||||||||||||||||||||||||||||||||||||||||
| History | |||||||||||||||||||||||||||||||||||||||||||||||||||||||||||||||
| Opened | 8 October 1877 | ||||||||||||||||||||||||||||||||||||||||||||||||||||||||||||||
| Electrified | March 1922 (1500 V DC overhead) | ||||||||||||||||||||||||||||||||||||||||||||||||||||||||||||||
| Passengers | |||||||||||||||||||||||||||||||||||||||||||||||||||||||||||||||
| 2005–2006 | 1,230,782[1] | ||||||||||||||||||||||||||||||||||||||||||||||||||||||||||||||
| 2006–2007 | 1,334,312[1]  8.41% | ||||||||||||||||||||||||||||||||||||||||||||||||||||||||||||||
| 2007–2008 | 1,488,092[1] 11.52% | ||||||||||||||||||||||||||||||||||||||||||||||||||||||||||||||
| 2008–2009 | 1,601,218[2] 7.6% | ||||||||||||||||||||||||||||||||||||||||||||||||||||||||||||||
| 2009–2010 | 1,736,247[2] 8.43% | ||||||||||||||||||||||||||||||||||||||||||||||||||||||||||||||
| 2010–2011 | 1,817,162[2] 4.66% | ||||||||||||||||||||||||||||||||||||||||||||||||||||||||||||||
| 2011–2012 | 1,760,183[2]  3.13% | ||||||||||||||||||||||||||||||||||||||||||||||||||||||||||||||
| 2012–2013 | Not measured[2] | ||||||||||||||||||||||||||||||||||||||||||||||||||||||||||||||
| 2013–2014 | 2,044,879[2] 16.17% | ||||||||||||||||||||||||||||||||||||||||||||||||||||||||||||||
| 2014–2015 | 1,926,482[1] 5.78% | ||||||||||||||||||||||||||||||||||||||||||||||||||||||||||||||
| 2015–2016 | 2,067,254[2] 7.3% | ||||||||||||||||||||||||||||||||||||||||||||||||||||||||||||||
| 2016–2017 | 2,063,917[2] 0.161% | ||||||||||||||||||||||||||||||||||||||||||||||||||||||||||||||
| 2017–2018 | 1,812,286[2] 12.19% | ||||||||||||||||||||||||||||||||||||||||||||||||||||||||||||||
| 2018–2019 | 1,733,101[2] 4.36% | ||||||||||||||||||||||||||||||||||||||||||||||||||||||||||||||
| 2019–2020 | 1,215,300[2] 29.87% | ||||||||||||||||||||||||||||||||||||||||||||||||||||||||||||||
| 2020–2021 | 765,050[2] 37.04% | ||||||||||||||||||||||||||||||||||||||||||||||||||||||||||||||
| 2021–2022 | 836,350[3] 9.31% | ||||||||||||||||||||||||||||||||||||||||||||||||||||||||||||||
| Services | |||||||||||||||||||||||||||||||||||||||||||||||||||||||||||||||
| |||||||||||||||||||||||||||||||||||||||||||||||||||||||||||||||
| |||||||||||||||||||||||||||||||||||||||||||||||||||||||||||||||
| |||||||||||||||||||||||||||||||||||||||||||||||||||||||||||||||
| |||||||||||||||||||||||||||||||||||||||||||||||||||||||||||||||


Oakleigh station is a railway station operated by Metro Trains Melbourne on the Pakenham and Cranbourne lines, which are part of the Melbourne rail network. It serves the suburb of Oakleigh in the south-east of Melbourne, Victoria, Australia. The station opened in 1877 as the up end of the Gippsland line, with the station being electrified in 1922.[4][5]
Oakleigh is a ground-level premium station, consisting of two sides that are connected to each other via the adjacent roads, and both platforms are connected to each other via a pedestrian subway.[6]
The station is served by 11 bus routes, including two SmartBus services. The station is approximately 15 kilometres (9.4 mi) or around a 27-minute train ride away from Flinders Street.[7]
Description

Oakleigh station is the main railway station in the suburb of Oakleigh. On the north side of the station is Portman Street, and Haughton Road is on the south. The station is owned by VicTrack, a state government agency, and is operated by Metro Trains Melbourne.[6] The station is approximately 15 kilometres (9.4 mi) or around a 27-minute train ride away from Flinders Street.[7]
Oakleigh station consists of two side platforms that are connected by a pedestrian subway, previously, platform 1 was an island platform, and the station consisted of three platforms.[8] The two platforms have direct station entrances on their adjacent roads, with platform 1 having an entrance on Haughton Road and platform 2 having an entrance on Portman Street.
There are three car parks at the station.[7] Oakleigh station is fully accessible as the subway features lift access and both platform entrances feature ramps.[9]
History
19th century
In 1877, the station opened as the western end of the Gippsland railway line, it received its current location in 1879, when the line was extended to South Yarra railway station.[10]
In 1883, the track was duplicated from Caulfield to Oakleigh, and in 1891, the line was duplicated to Dandenong.[11]
In 1888, the Rosstown line opened, with Oakleigh being the eastern terminus.[12] Two years later, the Outer Circle line opened from Oakleigh to Waverley Road station.[13]
20th century

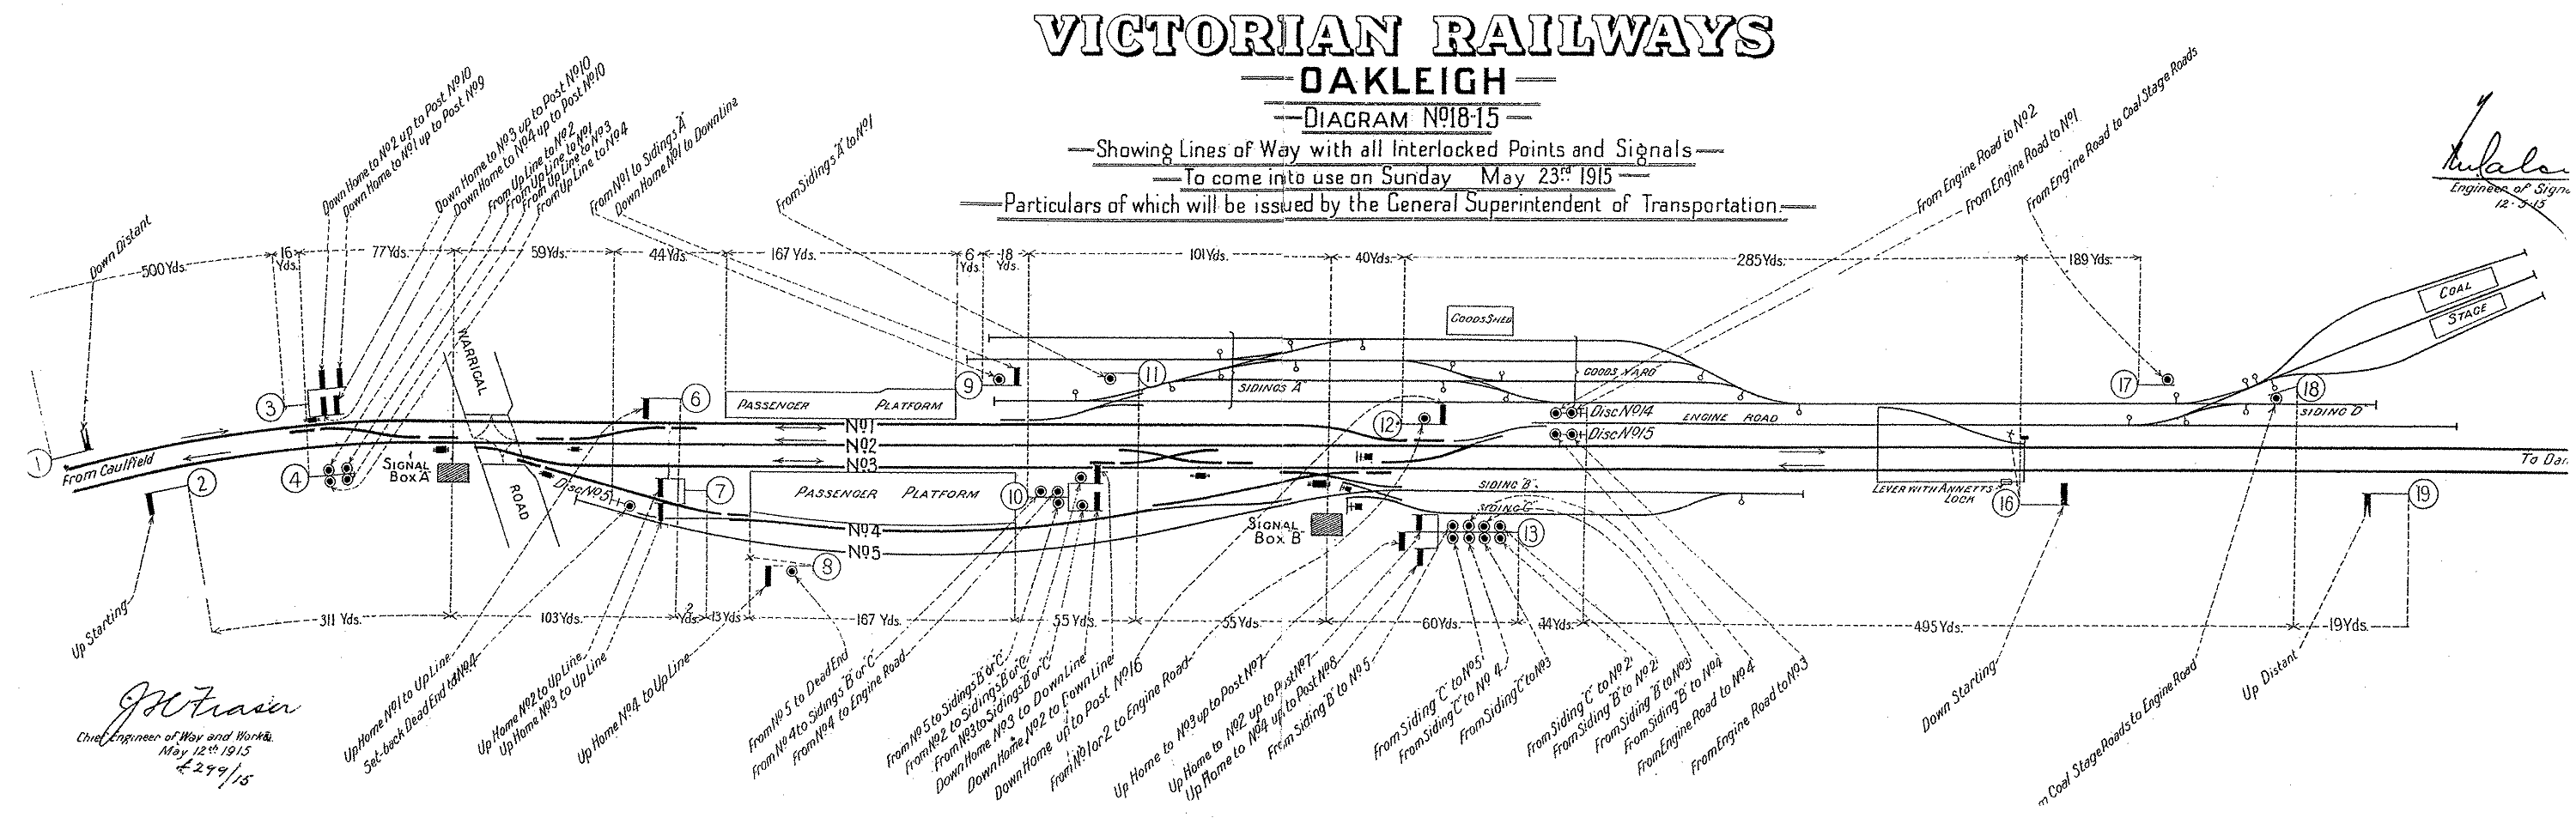
In c. 1910, the station featured two side platforms with an additional centre track. By this time, the station was controlled by two signal boxes; "A" at the city end, controlling the Warrigal Road level crossing and interlocked gates, and "B", between the station and yard, controlling the latter. In 1915, a new station building had been constructed to the same style as Box Hill, Caulfield, Essendon, Heidelberg and Spotswood in the Melbourne area, and Castlemaine and Warragul in the country.[14] A new platform was provided on the south side, plus a fifth track for engines to run around their consists.[15][16]
In March 1922, electrification was extended from Caulfield to Oakleigh, and this was extended to Dandenong during December of that same year.[11] Around the same time, the Hanover Street bridge was built across the Dandenong end of the goods yard, with alterations to the passenger sidings and the run-around loop south of the station was abolished.[17]
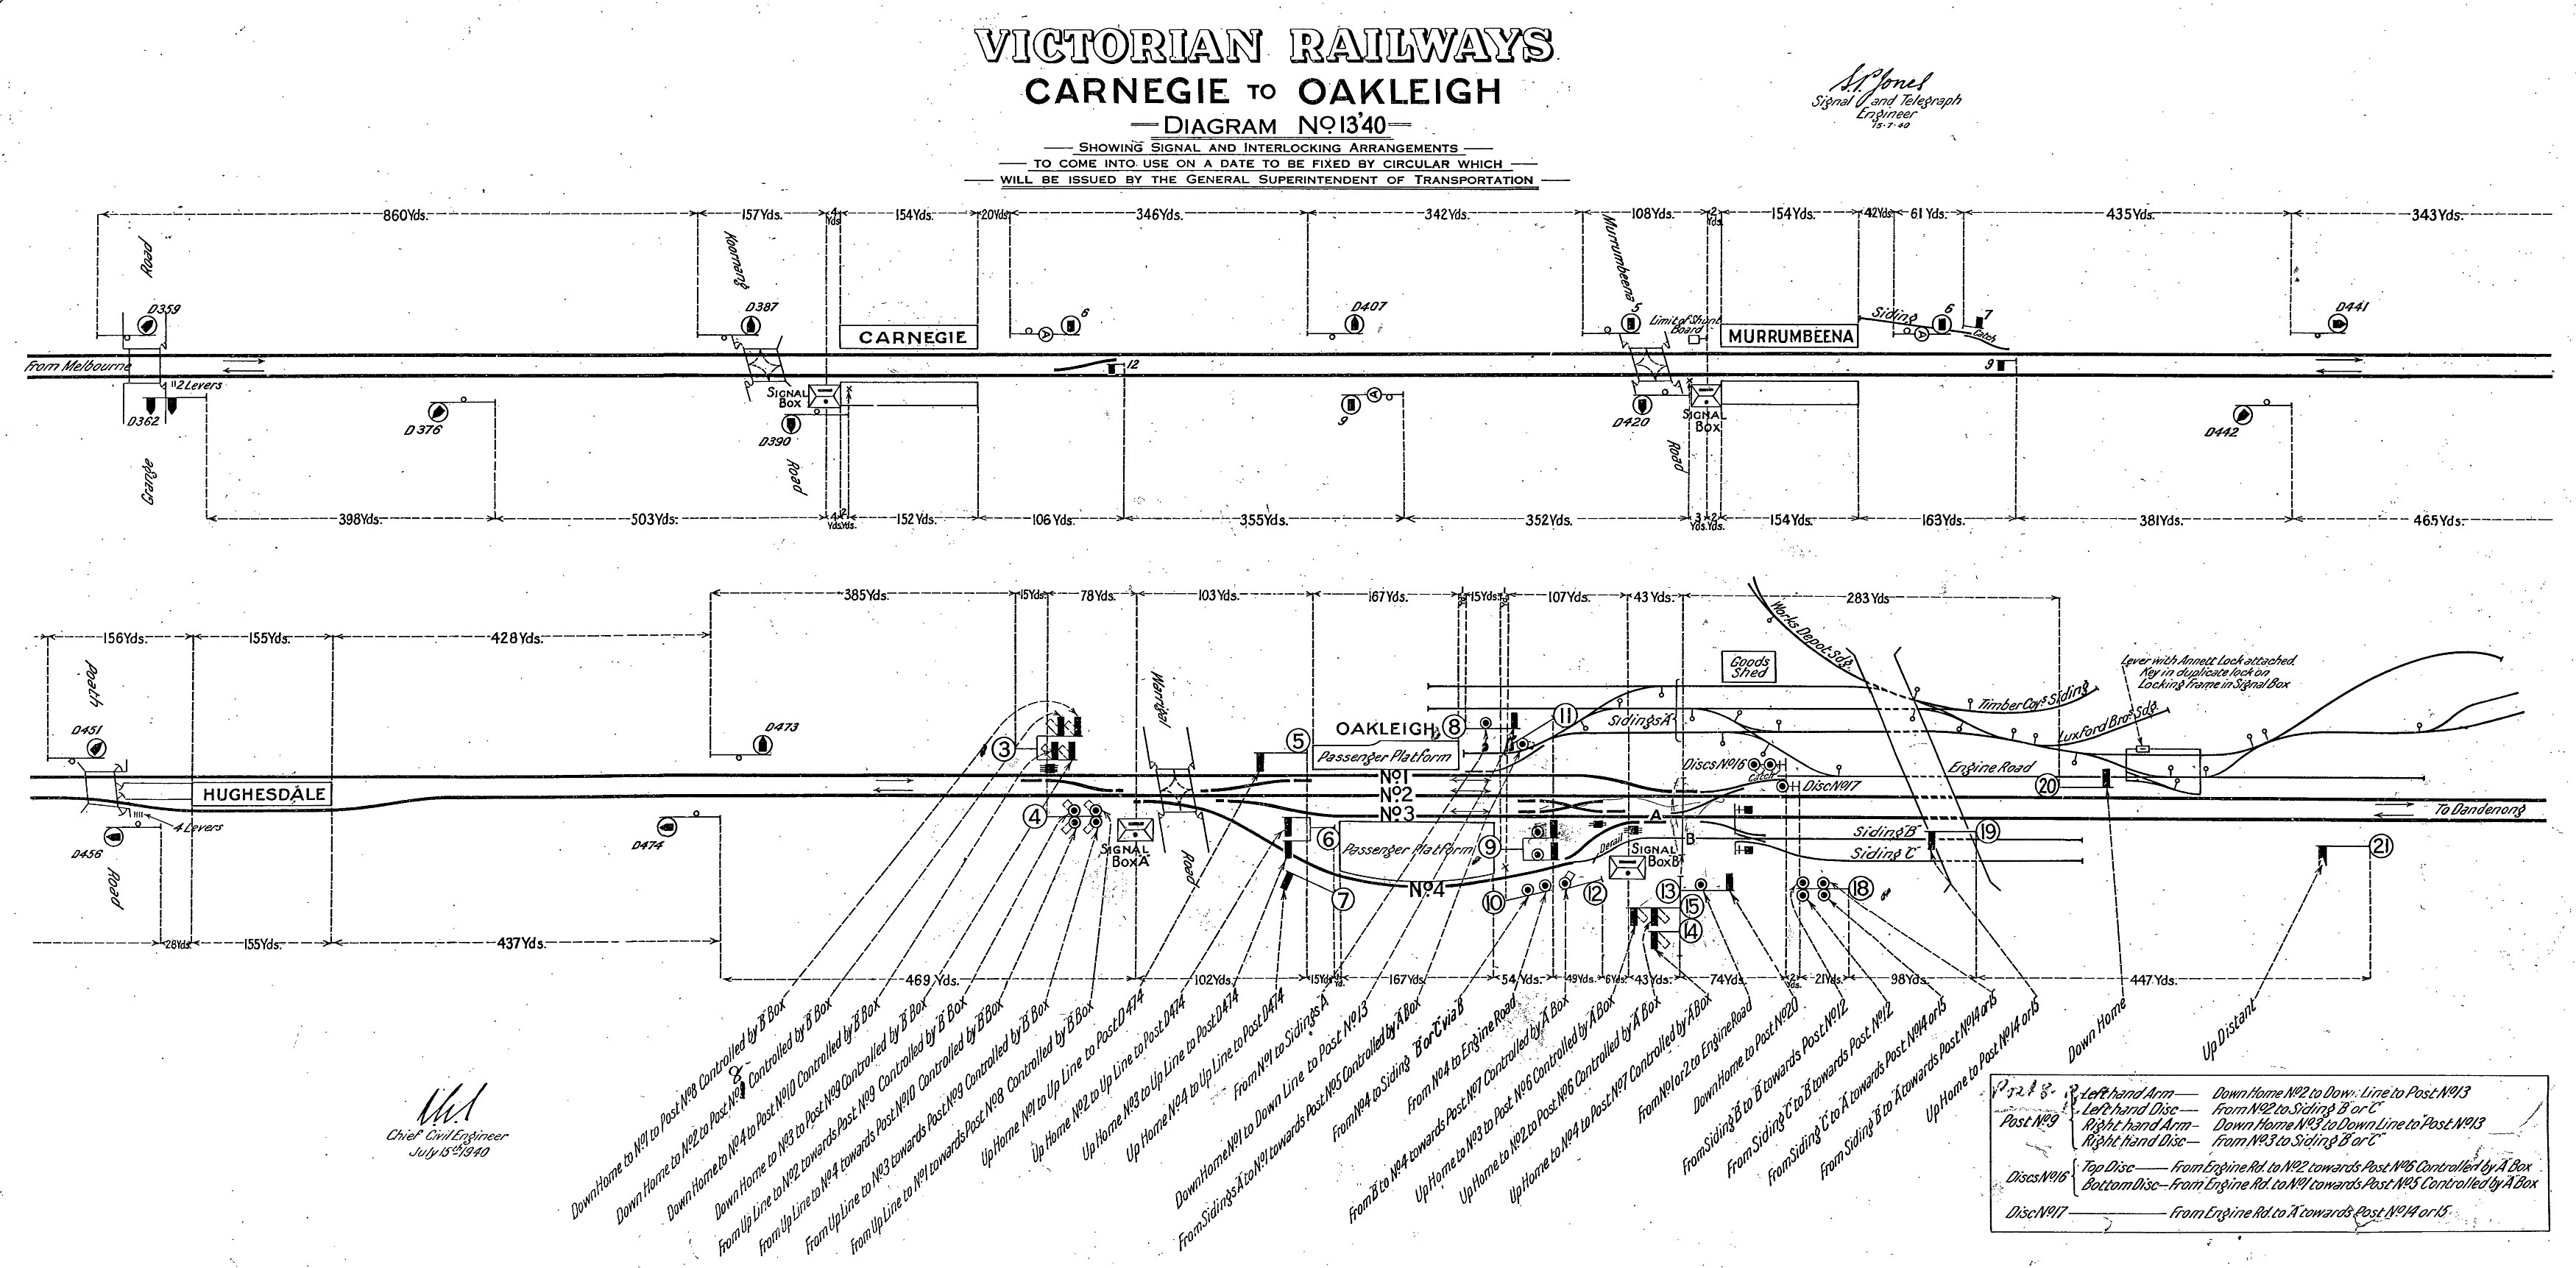
Three-position signalling was extended from Carnegie to the city end of Oakleigh (exclusive) in December 1940.[18][11] Extension of the signalling to Huntingdale and Clayton, in lieu of Winters Double Line Block safeworking, did not occur until 1970, in conjunction with the North Road (Huntingdale) grade separation project.
Warrigal Road grade separation
In 1968, the Warrigal Road level crossing was closed, and, in conjunction with the demolition of shops, a new road overpass was provided. The original Warrigal Road surface was partially retained as a slip lane to serve a handful of shops along the western boundary, and now provides access to Carlisle Crescent, Haughton Road, and limited car parking under the bridge. The road bridge piers were spaced to allow extension of the track from the southernmost platform in the citybound direction.[19]
In May 1972, a van that was on the 18:40 Traralgon goods train, which was shunting in the goods yard, derailed. This necessitated single line working on the Up line between Oakleigh and Caulfield, with buses used to convey passengers around the derailment site.[20]
1975 resignalling with hybrid relay and electronic interlocking
In 1975, the track layout was drastically simplified. Both mechanical signal boxes were abolished and demolished, being replaced with a new, experimental route-setting power interlocking system with a signalling control panel located in the middle of the southern station building.[21][22] In lieu of the older system with individual levers, switches or buttons for each signal and turnout or crossover, the new panel used custom circuit boards loaded with CMOS boolean logic chips (AND, NOR and JK Flip-Flop), and a button arrangement where the operator would select a route between any two signals, and that route would be requested, set and locked by the interlocking if available.[23] A 1972 report by BITRE indicated that the project would cost $330,000, and save $26,000 per year in staffing costs, plus avoiding $10,000 expected in upcoming overhaul costs for the existing mechanical systems, with a total benefit/cost ratio over 40 years of 1.7:1 at 7% discount rates or 1.3 at 10% discount rates.[24] In practice, the new interlocking lasted 43 years.
The new signal panel included a "switch out" feature, allowing the station's signalling to operate automatically during periods of reduced traffic. To facilitate this, the island platform was used for most trains, with high-speed (40 mph (65 km/h)) turnouts provided at either end to avoid trains slowing down significantly for the diverging movements. Station staff operated the signal panel during busier times to allow access to or from the goods yard, terminating trains, or overtaking moves in either direction.[25] While the panel was switched out, express trains through Oakleigh were assumed to run express through Hughesdale, Murrumbeena and Carnegie as well, and given altered level crossing timings. While the panel was switched in this express/stopping selection had to be made manually.[26]
The panel was designed over a span of two years, combining a series of different interlocking and system techniques as a testing ground for later use in the City Loop control systems then being planned out.[23]: 1 The new features being implemented included the use of Geographic Relay Interlocking for vital controls only, CMOS integrated circuits for non-vital route setting controls and indications and provision of LEDs instead of filament lamps for the control panel indications, mated with B.R.B. style clamp-lock point machines worked by compressed air, Westinghouse electro-pneumatic Train stops, and high voltage Jeumont impulse track circuits to avoid compatibility problems with then-future trains which would have used Thyristor controls.[23]: 1
The panel was designed to work Oakleigh primarily, but futureproofed to absorb Huntingdale (with a possible junction and branch line to Rowville), as well as yards at Westall and Springvale;[23]: 1 noting that at the time the latter two each had a handful of goods sidings, well pre-dating the concept of providing an extensive maintenance facility at Westall.
A number of geographic circuit-based interlockings were studied in advance of the project but none were entirely suited to the Victorian Railways' use case, so a new system had to be developed in-house.[23]: 2 Geographic relay interlockings used a series of modules, e.g. one for a signal, one for a set of points or a crossover, which were then wired together to form a replica of the track arrangements.[23]: Figures 3, 4, 6 & 7 The relays and other electronic components could be placed haphazardly around the control rooms so long as the wiring and logic followed the required pattern. However, having all functions use relays was more expensive, maintenance intensive and required more space to lay out all the equipment needed. For this reason, devolving the non-critical functions to integrated circuit logic was deemed appropriate.[23]: 1–2 The standardised components and modules could be tested off-site, including building whole or part of a combined sequence, then moved to the field and installed fairly rapidly. This also meant far fewer instances of custom arrangements. For example, a pair of crossovers between three tracks is (more or less) functionally identical to a double compound with single turnouts either side, so the same wiring arrangement could be used for both. Single compound turnouts could be laid out similarly, with the handful of impossible routes patched out by use of free-wired inhibiting connections (e.g. points A always requiring points B, thus disabling the option of A only).[23]: 1–2
Individual geographic modules were linked together by cables. Each module had plugs from a series labelled A-H, J-N, P-S and Z, depending on the specific module. Plugs A-F inclusive, where provided, assembled adjacent modules to form the track layout. These were 20-way plugs, but only 10 wires would be used in cases of single-direction traffic (for example, Plug B pins 11-20 could link to Plug A pins 1-10 of the next module).[23]: Figure 4 Plug G was for the feed to and from the signal control panel and H to the field, e.g. signals and points. J was the power supply and some repeating functions. 20-way plugs K, L and M, and 50-way plugs N, P, R and S, were used for circuit modification, enabling or disabling features of a given module based on adjacent modules' settings. J and K were reserved for internal circuit variation. M allowed control of relay coils, N, P and S were relay changeover contacts. Finally, 20-way plug Z was to attach a monitoring unit to the relay interlocking, allowing review of the functions from the interlocking room without having to go back and forth to the panel in the main station building. Plug couplers used were AMP series M pin and socket connectors.[23]: 3–4
Within the two sets of ten wires between module plugs A-F inclusive, wires were allocated to specific tasks:
| Pin number | Code | Circuit |
|---|---|---|
| 1 or 11 | BRR | Block require relay |
| 2 or 12 | RR | Route proving relay |
| 3 or 13 | H | Stick path of route locking relay |
| 4 or 14 | H | Pick up path of route locking relay |
| 5 or 15 | GR | Signal control relay |
| 7 or 17 | cGR | Low speed signal control relay |
| 8 or 18 | cPBS | Low speed push button stick |
| 9 or 19 | ASR | Approach locking relay for signal plus one in advance |
| 10 or 20 | ASR | Approach locking relay for signal |
Note wires 6 and 16 were not used.[23]: 5–6
Each module was fitted with all relays, even if some went unused. This was to allow modules to be swapped or replaced at short notice in case of a failure. An example of a disused relay is a signal without a low-speed indication, in which case the cPBS relay would be fitted but permanently de-energised. This would retain the circuit testing for that light, but in a default position; in some cases a "dummy unit" would be fitted instead. Another example would be a relay always energised, which would be achieved by feeding 50 volts DC directly to the power supply for that relay; this would be used to modify crossover boards, for example, to reflect the intended operations.[23]: 6–7
As with previous geographic relay interlockings, the Victorian Railways maintained the standard of electromechanical points being worked from the control panel via the NLPR and RLPR relays for Normal and Reverse operation respectively (typically, but not always, the straight and curved route respectively), including testing that the opposite route was not simultaneously set. Signal controls were worked by the AOR relay, and low speed signal controls by the cPBS "stick" relay, which depending on the context may only cancel if manually overridden.[23]: 7
Activation of signals was provided by a chain of BRR relay contacts in the relevant track modules, in order and sequence from the closest to furthest. This circuit would turn around at the far end and return via the RR relays, proving that the route had been requested and completely set, with no conflicts. The back-flow also continuously disabled opposing moves and de-energised the power supply to the first turnout in the route, thus locking it in whichever position it was in; this turnout locking would then be cascaded forward through the entire route in order. With all this completed, the signal relay GR would then be energised, allowing the signal to show an aspect other than Stop and energising the train stop motor to a lowered position. The specific aspect was determined separately by free-wiring, to accommodate the requirements of each location. This was necessary because Victorian speed signalling was not merely red, yellow and green lights, but included aspects for different speeds depending on the direction.[23]: 7
In the relay room each module had a small monitoring panel provided with three LEDs per route, red for the block Required Relay being active, yellow for the Route Proving relay, and green for the Signal Control relay. Each LED was worked from the 50 volt supply with a 6000 ohm, 10 watt resistor in series, and worked in parallel with the relay contacts for each job rather than the relay coils.[23]: 9, Figure 15
After resignalling
On 8 May 1981, a train entering service from Oakleigh sidings derailed, blocking the morning peak hour services. This trapped the following school train from Moe, so a Harris train was run "wrong line" (backwards relative to normal procedures) and parked parallel, with students transferring carefully between the two.[27] A similar incident occurred on 26 January 1982, as a train exiting siding "C" passed signal 38 at Clear Low Speed but 30 at Danger, derailing on the catch points and obstructing the citybound track from around 9am.[28] The train was rerailed by 5:30pm, but one of the cranes used in the operation became bogged while exiting the worksite.[29]
On Friday 4 December 1981, The Overland train service was stabled in Oakleigh due to an industrial dispute.[30]
In May 1984, the goods yard was officially closed to traffic, with the exception of briquette traffic, which was still being received. Way and Works waggon HD205, which had been parked at the city end of the through siding for years, was transferred to the Caulfield depot on 22 June 1984.[31] By October that year, the briquette traffic had also shifted to Westall.[32] The overhead in siding "A" was removed by December of that year, along with the points and the majority of the sidings.[32] In mid-October 1984 the last traffic, delivery of loose briquettes for bagging and sale, was transferred to Westall, and by 3 December 1984 the overhead wiring was removed from Siding "A". Between 17 and 20 December 1984 most of the goods yard trackwork was lifted and advertising hoardings were laid out for the new shopping centre then under development. On 14 January 1985 four, four-wheel wagons' worth of timber sleepers were delivered from Deniliquin along with 53 kg/m (110 lb/yd) B.H.P. steel rails, to renew the long siding for use as a refuge;[33] the new sleepers were sighted being laid out on the down side of the Hanover Street bridge on 5 February 1985.[34] However, by 3 March 1985 the through siding had not yet seen any traffic, and the overhead power had not yet been reconnected. The goods shed, on the other hand, was still in use by Melcan, a wholesale company, to store bags of cement. They had been expecting to move to Westall but the destination building was destroyed in a fire on 13 April 1985.[35]
In March 1987, a guards' indicator light was provided for signal post 16, controlling citybound moves from Platform 1.[36]
As of April 1988, suburban timetables specified an overtaking move between outbound suburban and country trains, where the 16:53 and 17:36 departures from Flinders Street to Dandenong were each scheduled to wait 3 minutes at Oakleigh, for a Traralgon and Warragul service, respectively.[37]
Since 1989, the station has featured over 40 plywood cut-outs on its walls and surrounding the station. These illustrate the life stories of Oakleigh residents, who were aged between 15 and 70, when the murals were unveiled in September of that year. In 2002, they underwent restoration.[38] About half of these have since been restored, and glue can still be seen on the walls of the station building where the remainder had previously been placed.
On 12 December 1995, Oakleigh was upgraded to a premium station.[39]
When the Cranbourne line was electrified in 1995, trains that had previously terminated at Oakleigh were extended, and the passenger train stabling sidings fell into disuse. The extended goods siding that was along the north side fell out of use and was abolished around the same time, although the shell of the citybound dwarf signal at the down end remained in place until 2018. As a result, the signal panel was generally only used when the underpass flooded, as all trains in both directions could be diverted to the north-side platform (by then renamed Platform 3). The suburban sidings were restored to service in late 2004, but were only used occasionally after that, with further periods out of service.[40]
21st century
On 3 May 2007, a Flinders Street bound Siemens train from Pakenham derailed over a set of points at the Down end of the station.[41][42]
After the Siemens trains experienced braking issues in the mid-2000s, all trains were required to be signalled through as express trains, whether or not they actually stopped at Oakleigh.[43] This gave additional boom barrier downtime at the level crossings between Oakleigh and Caulfield, but provided a safety margin in case of brake failure.[40]

On the night of 29 May 2018 the line between Caulfield and Westall was closed for Level Crossing Removal Project works, and the opportunity was taken to re-signal the entire section of railway including reconfiguring of Oakleigh Station. The signal panel, platform 1, pointwork either side of the platforms and sidings B and C were all abolished and progressively removed.[44] New tracks were laid either side of the remaining platforms, and the former platform 1 alignment was converted into a side platform, with former platforms 2 and 3 renumbered to platforms 1 and 2.[45] A new trailing crossover was provided towards Hughesdale station, and the former far down-end crossover was included in the new signalling system, all of which was worked from Dandenong. The panel was later extracted for preservation.
Throughout 2018–2019, Oakleigh was upgraded and modernised. Two concourses were built, lifts were installed, and the underpass was refurbished. Two heritage-listed buildings were maintained as originally built.[45][46]
Platforms and services

The station is currently served by both the Pakenham and Cranbourne lines, which are both operated by Metro Trains Melbourne. Services to East Pakenham and Cranbourne travel together south-east towards Dandenong before splitting into two separate lines. Services to the city run express from Caulfield (Malvern during off-peak) to South Yarra before stopping at all stations to Flinders Street via the City Loop.[47]
| Oakleigh platform arrangement | |||||
|---|---|---|---|---|---|
| Platform | Line | Destination | Via | Service Type | Source |
| 1 | Cranbourne line Pakenham line |
Sunbury, Watergardens, West Footscray | Town Hall | Limited express | [48] |
| 2 | Cranbourne line Pakenham line |
East Pakenham, Cranbourne, Westall | All stations | [48] | |
Transport links
Oakleigh Station is served by a total of eleven bus connections, including two Smartbus routes. Most routes (624, 693, 704, 742, 800, 802, 804, 862, and Smartbus Routes 900 and 903) serve the bus interchange on Portman Street just north of the railway station.[49] Whereas bus routes 625, 701, and 733 serve the bus stop on Johnson Street.[50] On Haughton Road there is a pair of rail replacement bus stop used during rail works on the Pakenham and Cranbourne lines mainly along the Westall to Caulfield section.
Portman Street
Westbound (Bays "A", "B", "C")
Bay "A" (Stop ID 19805) is nearest to the station, Bay "B" is in the middle (Stop ID 19804), and Bay "C" (Stop ID 19803) is nearest to the Warrigal Road bridge.
- Bay "A" - 742 : Ringwood station to Chadstone Shopping Centre[51]
- Bay "A" - SmartBus 900 : Rowville to Caulfield station[52]
- Bay "A" - SmartBus 903 : Mordialloc to Altona station[53]
- Bay "B" - 800 : Dandenong station to Chadstone Shopping Centre[54]
- Bay "B" - 802 : Dandenong station to Chadstone Shopping Centre[55]
- Bay "B" - 804 : Dandenong station to Chadstone Shopping Centre[56]
- Bay "B" - 862 : Dandenong station to Chadstone Shopping Centre[57]
- Bay "C" - SmartBus 903 : Altona station to Mordialloc[53]
Eastbound (Bay "D")
(Stop ID 19800)
- 624 : to Kew[58]
- 693 : to Belgrave station[59]
- 704 : to Westall station[60]
- 800 : Chadstone Shopping Centre to Dandenong station[54]
- 802 : Chadstone Shopping Centre to Dandenong station[55]
- 804 : Chadstone Shopping Centre to Dandenong station[56]
- 862 : Chadstone Shopping Centre to Dandenong station[57]
- SmartBus 900 : Caulfield station to Rowville[52]
Johnson Street (Bay "E")
(Stop ID 12964)
- 625 : Elsternwick – Chadstone Shopping Centre[61]
- 701 : to Bentleigh station[62]
- 733 : to Box Hill station[63]
Note some services terminate on Haughton Road opposite the entrance to Platform 1, at Bay "F", then run empty via Mill Road to start their next trip from Bay "E".
References
- 1 2 3 4 Estimated Annual Patronage by Network Segment Financial Year 2005–2006 to 2018–19 Department of Transport
- 1 2 3 4 5 6 7 8 9 10 11 12 Railway station and tram stop patronage in Victoria for 2008–2021 Philip Mallis
- ↑ Annual metropolitan train station patronage (station entries) Data Vic
- ↑ "4. The Gippsland Railway". Monash City Council. Retrieved 18 March 2023.
- ↑ "Report upon the Application of electric traction to the Melbourne suburban railway system". Trove. Retrieved 13 February 2023.
- 1 2 "Oakleigh". www.metrotrains.com.au. Retrieved 12 February 2023.
- 1 2 3 "Pakenham Line". Public Transport Victoria. Retrieved 12 February 2023.
- ↑ "VICSIG". vicsig.net. Retrieved 22 August 2023.
- ↑ "Access Guide". www.metrotrains.com.au. Retrieved 16 March 2023.
- ↑ "4. The Gippsland Railway". City of Monash. Retrieved 15 February 2023.
- 1 2 3 "Oakleigh". Vicsig.
- ↑ "Rosstown rail trail". City of Glen Eira. 26 September 2018. Retrieved 15 February 2023.
- ↑ "Outer Circle Railway". www.onlymelbourne.com.au. Retrieved 15 February 2023.
- ↑ Ward, Andrew; Donelly, Alister (March 1982). Victoria's Railway Stations, An Architectural Survey. Vol. 4 - The Twentieth Century, 1900 - 1930 (including Portable Station Buildings). Australian Railway Historical Society. p. 20-27.
- ↑ "Victorian Railways diagram 18'15". VictorianRailways.net.
- ↑ Jungwirth, A.N.; Lambert, K.L. (1996). Weekly Notice Extracts 1894-1994. Weekly Notice Productions. p. 265-266, WN 22/1915. ISBN 0646300105.
- ↑ Victorian Railways diagram 4'22
- ↑ "Victorian Railways diagram 13'40". VictorianRailways.net.
- ↑ "Negative – Oakleigh Railway Station Crossing, Warrigal Road, Oakleigh, Victoria, 06 Aug 1959". Museums Victoria Collections. Retrieved 15 February 2023.
- ↑ "Delays, etc". Divisional Diary. Australian Railway Historical Society. May 1972. p. 13.
- ↑ Winter, Vincent Adams (1990). VR and VicRail: 1962–1983. p. 106. ISBN 0-9592069-3-0.
- ↑ "Works & Safeworking". Newsrail. Australian Railway Historical Society. January 1976. p. 18.
- 1 2 3 4 5 6 7 8 9 10 11 12 13 14 15 Harvey, R.G.; Niehoff, P.G.; Burton, I. (10 March 1975). "Signalling Developments on the Victorian Railways at Oakleigh" (Document). Read at the Annual Meeting at Mount Buffalo. Victoria: The Institution of Railway Signal Engineers, Australian Section.
- ↑ Review of Public Transport Investment Proposals for Australian Capital Cities, 1973/74 (PDF). Canberra: Australian Government Publishing Service. 1973. pp. 104–105 – via Bureau of Transport Economics.
- ↑ "VICSIG". vicsig.net. Retrieved 15 February 2023.
- ↑ "OAK_G011" (Document). VicTrack Access. 22 April 2007. p. 3.
- ↑ "Delays, Derailments, etc". Newsrail. July 1981. p. 161.
- ↑ "Oakleigh". VictorianRailways.net. 4 January 2012.
- ↑ "Delays, Derailments, etc". Newsrail. March 1982. p. 46.
- ↑ "Traffic". Newsrail. March 1982. p. 42.
- ↑ "Newsrail August 1984". Newsrail. August 1984. p. 245.
- 1 2 "Works". Newsrail. Australian Railway Historical Society (Victorian Division). March 1985. p. 90. ISSN 0310-7477.
- ↑ "Works". Newsrail. Vol. 13, no. 3. Vic: Australian Railway Historical Society (Victorian Division). March 1985. p. 90. ISSN 0310-7477. OCLC 19676396.
- ↑ "Works". Newsrail. Vol. 14, no. 04. Vic: Australian Railway Historical Society (Victorian Division). April 1986. p. 122. ISSN 0310-7477. OCLC 19676396.
- ↑ KH (August 1985). "Works". Newsrail. Vol. 13, no. 8. Vic: Australian Railway Historical Society (Victorian Division). p. 252. ISSN 0310-7477. OCLC 19676396.
- ↑ "Works". Newsrail. Australian Railway Historical Society (Victorian Division). March 1987. p. 88.
- ↑ "Works". Newsrail. Australian Railway Historical Society (Victorian Division). April 1988. p. 120.
- ↑ "Oakleigh Mural Restoration Nears Completion". City of Monash. 7 February 2002. Archived from the original on 20 August 2004.
- ↑ "Upgrading Eltham to a Premium Station". Newsrail. Australian Railway Historical Society. October 1997. pp. 303–315.
- 1 2 "VICSIG". vicsig.net. Retrieved 15 February 2023.
- ↑ Moynihan, Stephen (4 May 2007). "Derailment puts commuters off track". The Age. p. 6.
- ↑ "Oakleigh Derailment". Vicsig.
- ↑ "Signalling Alterations" (PDF). Somersault. 30 (4). Signalling Record Society of Victoria Inc: 59. July 2007. Retrieved 29 December 2025.
- ↑ "Signalling Alterations" (PDF). Somersault. 41 (4). Signalling Record Society of Victoria Inc: 71. July 2018. Retrieved 29 December 2025.
- 1 2 "Oakleigh's station precinct plans open for public consultation". Urban.com.au. 25 September 2018. Retrieved 16 March 2023.
- ↑ Andrews, Daniel. "Oakleigh Station Upgrade Underway To Benefit Commuters | Premier of Victoria". Premier of Victoria. Retrieved 15 February 2023.
- ↑ "Oakleigh Station". Public Transport Victoria. Retrieved 13 February 2023.
- 1 2 "Cranbourne, Pakenham & Sunbury Line timetable 2026" (PDF). Transport Victoria. 1 February 2026. Retrieved 29 July 2026.
- ↑ "Oakleigh Station/Portman St". Public Transport Victoria. Retrieved 16 March 2023.
- ↑ "Oakleigh Station/Johnson St". Public Transport Victoria. Retrieved 16 March 2023.
- ↑ "742 Ringwood - Chadstone SC via Vermont South & Glen Waverley & Oakleigh". Public Transport Victoria. Retrieved 10 March 2019.
- 1 2 "900 Stud Park SC (Rowville) - Caulfield via Monash University & Chadstone (SMARTBUS Service)". Public Transport Victoria.
- 1 2 "903 Altona - Mordialloc (SMARTBUS Service)". Public Transport Victoria. Retrieved 10 March 2019.
- 1 2 "800 Dandenong - Chadstone via Princes Highway & Oakleigh". Public Transport Victoria. Retrieved 10 March 2019.
- 1 2 "802 Dandenong - Chadstone via Mulgrave & Oakleigh". Public Transport Victoria. Retrieved 10 March 2019.
- 1 2 "804 Dandenong - Chadstone via Wheelers Hill & Oakleigh". Public Transport Victoria. Retrieved 10 March 2019.
- 1 2 "862 Dandenong - Chadstone via North Dandenong & Oakleigh". Public Transport Victoria. Retrieved 10 March 2019.
- ↑ "624 Kew - Oakleigh via Caulfield & Carnegie & Darling and Chadstone (From 4-11-2018)". Public Transport Victoria.
- ↑ "693 Belgrave - Oakleigh via Ferntree Gully & Brandon Park". Public Transport Victoria. Retrieved 10 March 2019.
- ↑ "704 Oakleigh Station - Westall Station via Clayton". Public Transport Victoria. Retrieved 12 May 2020.
- ↑ "625 Elsternwick - Chadstone via Ormond & Oakleigh". Public Transport Victoria. Retrieved 10 March 2019.
- ↑ "701 Oakleigh - Bentleigh via Mackie Road & Brady Road". Public Transport Victoria. Retrieved 10 March 2019.
- ↑ "733 Oakleigh - Box Hill via Clayton & Monash University & Mt Waverley". Public Transport Victoria. Retrieved 10 March 2019.
External links
 Media related to Oakleigh railway station, Melbourne at Wikimedia Commons
- Melway map at street-directory.com.au